▷ Practice 24: Firebase
⭐⭐⭐⭐⭐ Practice 24: Firebase
- ➡️ #TSCLab #TCLab #ESP32 #Arduino #Control #PWM #PID #Matlab #RPM #HTTP #MQTT #OTA #Telegram #FireBase #NodeRed
- ✅ Source TSC-LAB: www.tsc-lab.blogspot.com
- ✅Github Repositories
- ⭐When using this resource, please cite the original publication:
General objective:
- Sense data and upload it to Firebase Realtime Database.
Materials:
- Firebase
- TSC-Lab


Introduction:
Firebase is a platform for the development of web and mobile applications, launched in 2011 and acquired by Google in 2014. It is a cloud-based platform, integrated with Google Cloud Platform, which utilizes a set of tools for the creation and synchronization of projects aimed at delivering high-quality applications. This enables the growth of the user base and also facilitates greater monetization.
In this current project, the aim is to utilize the Realtime Database, a cloud-hosted NoSQL database that allows you to store and synchronize data among your users in real-time. To achieve this, temperature data will be sensed and uploaded along with the PWM (pulse-width modulation) of the heater. These data points will be sorted by date and time.
Steps:
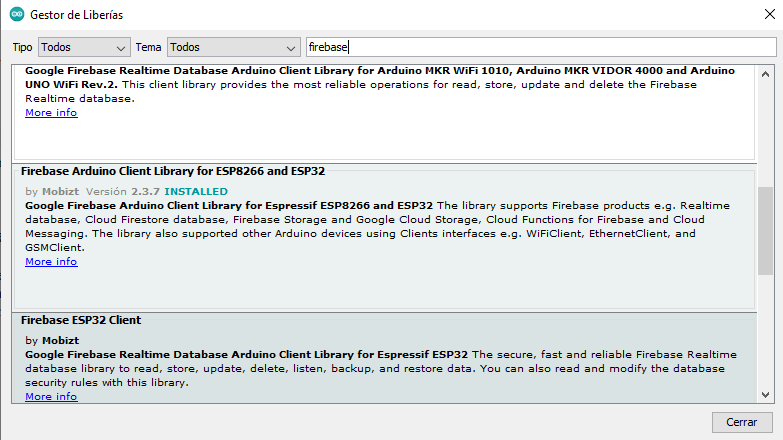
Note: You must be logged in to your Google account. It is assumed that you have installed the libraries from previous practices, and additionally, you need to install the Firebase Arduino Client for ESP8266 and ESP32 library, version 2.3.7 (this version is recommended to avoid potential issues).
The steps to carry out this practical are the following:
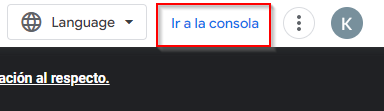
- Go to Firebase (google.com) and at the top right select Go to console.

- If this is the first time you are using Firebase, a screen like the following will appear, and you must select "Create a project."

- Give the project a name, accept the conditions, confirm the use of Firebase and click "Continue".

- Enable Google Analytics and click "Continue".

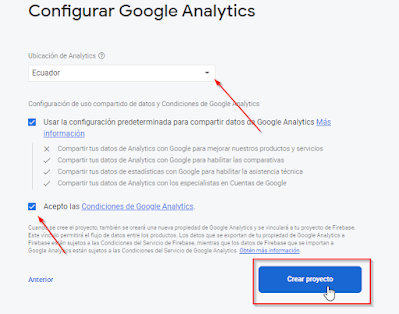
- Configure Google Analytics, select Ecuador as the location, accept the conditions and click "Create project".
- The project will be created and a screen like the one shown below will appear and click "Continue".

- On the left side of the screen, click on Compilation, several options will be displayed and click on "Realtime Database".

- Click on "Create a database".

- Choose United States as location and click "Next".

- For this occasion select "Start in test mode" and click "Enable".

- Create an authentication method.

- Click "start".

- Select "Anonymous".

- Habilitar el switch y guardar.

- Copy the following code to the Arduino IDE, but do not upload it to TSC-Lab yet.


⭐ Practice repository: https://github.com/vasanza/TSC-Lab/tree/main/Practice41
- Copy the URL of the project and paste it on line 20 of the code (FIREBASE_HOST variable) previously copied.

- On the left side of the screen, click here:

- Click on "Project Settings".

- Copy the WEB API key and paste it into the API_KEY variable.

- Change the WiFi credentials and upload the code to the TSC-Lab.
- Once the code is uploaded, in the Realtime Database section you can view the data upload.


Read related topics
- ✅ USB DATA ACQUISITION - OPEN LOOP (Temperature Control Lab)
- Initial setups and tests
- Ambient temperature reading using sensor 1 and 2
- Activation of Transistor 1 and Reading of temperature sensor 1 and 2
- Activation of Transistor 2 and Reading of temperature sensor 1 and 2
- Activation of Transistor 1 and 2, also Reading of temperature sensor 1 and 2
- ✅ USB DATA ACQUISITION - OPEN LOOP (Speed Control Lab)
- Initial setups and tests (ON/OFF)
- Speed control using PWM
- Motor direction control and Speed control
- Encoder Implementation (RPM)
- Data acquisition with square velocity input
- ✅ MATLAB DATA ACQUISITION (USB)
- ✅ SYSTEM IDENTIFICATION (Matlab)
- ✅ SISO PID CONTROLLER DESIGN (Matlab)
- ✅ CLOSED-LOOP WITH CONTROLLER IN MATLAB (*)
- ✅ IOT PLATFORMS (*)
- Wifi connection
- ThingSpeak (HTTP)
- FireBase (HTTP)
- Firebase data collection (HTTP)
- Over-The-Air programming (OTA)
- NodeRed (USB)
- NodeRed (Wifi)
- NodeRed (HTTP) + Telegram
- NodeRed (HTTP) + ThingSpeak
- ✅ MQTT DATA ACQUISITION
- ✅ CLOSED-LOOP WITH CONTROLLER IN ESP32
- ✅ MORE POWERFUL APPLICATIONS
Comentarios
Publicar un comentario